
Materials:
Colour A: Bernat Forever Fleece – Rose Hip
Colour B: Bernat Forever Fleece – Patchouli
Colour C: Rico Ricorumi DK – Black
Colour D: Rico Ricorumi DK – White
Stuffing
Crochet Hooks:
Colour A/B: 4mm
Colour C/D: 2.5mm
Stitches and abbreviations used:
St/Sts – Stitch/Stitches
Ch – Chain
Sc – Single Crochet
BLO – Back loop only
Sl st – Slip stitch
Please note:
Read through the pattern throughly before starting to ensure you are familiar with all the methods that are used.
I highly recommend to use the same hook and yarns as listed above or you might not achieve the same result.
Please do not replicate this pattern and share as your own, even if you’ve tweaked certain parts. I am happy for you to sell your makes to friends and family but I ask that you do not list your makes online. Many thanks!
Pattern:
Leg 1:
1. Using colour A, work 6 sc in magic ring (6)
2. Inc in each st (12)
3. [1 sc, 1 inc] x6 (18)
4. [2 sc, 1 inc] x6 (24)
5. [3 sc, 1 inc] x6 (30)
6. Sc in BLO (30)
7. Sc in each st (30)
8. Switch to colour B and sc in each st (30)
9-12. Sc in each st (30) Fasten off.
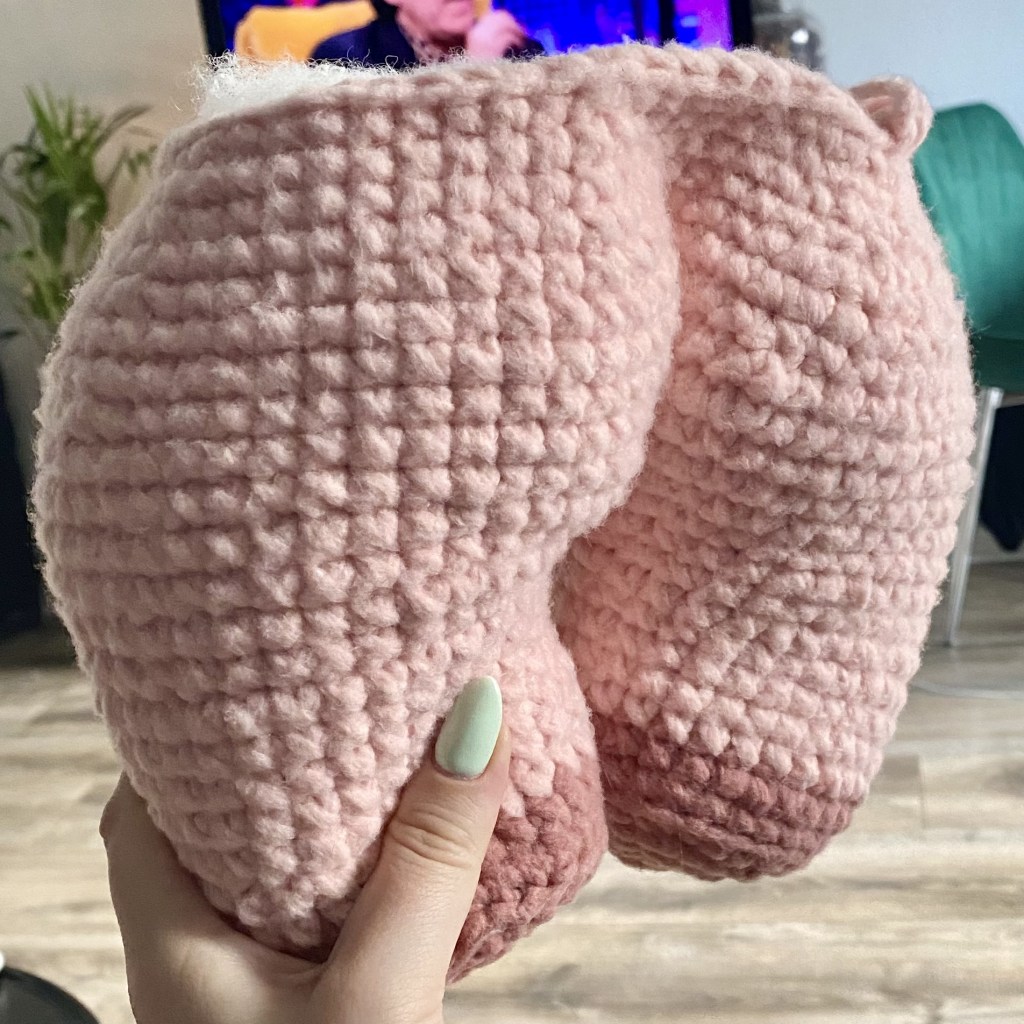
Leg 2 & body:
1. Using colour A, work 6 sc in magic ring (6)
2. Inc in each st (12)
3. [1 sc, 1 inc] x6 (18)
4. [2 sc, 1 inc] x6 (24)
5. [3 sc, 1 inc] x6 (30)
6. Sc in BLO (30)
7. Sc in each st (30)
8. Switch to colour B and sc in each st (30)
9-12. Sc in each st (30) Do NOT Fasten off.
13. You’ll now connect the two legs. With leg 2 still on
the hook, ch 4, then sc across all 30 sts of leg 1, ch 4,
sc across all 30 sts of leg 2 (68)
14. Sc in each st (68)
15. [10 sc, inc] x6, sc 2 (74)
16. Sc in each st (74)
17.[Inc] x4, sc 33, [inc] x4, sc 33 (82)
18-20. Sc in each st (82)
Now stitch up the gap from where you joined the legs. Simply sew across the gap from the two chains using a tail of colour B. Then continue working on the body.
21. [Sc 11, inv.dec] x6, sc 1, [inv.dec] x1, sc 1 (75)
22-23. Sc in each st (75)
24. [Sc 10, inv.dec] x6, sc 1, [inv.dec] x1 (68)
25. Sc in each st
26. [Sc 9, inv.dec] x6, sc 2 (62)
27. Sc in each st (62)
28. [Sc 8, inv.dec] x6, sc 2 (56)
29. [Sc 7, inv.dec] x6, sc 2 (50)
30-31. Sc in each st (50)
Start stuffing the legs and body, one side of the body will naturally want to fold in on it’s self which is what will create the bum, let it! Then stuff the belly side firmly and highlight the bum cheeps with more stuffing on each side.
32. [Sc 6, inv.dec] x6, sc 2 (44)
33. Sc in ech st (44)
34. [Sc 5, inv.dec] x6, sc 2 (38)
35-37. Sc in each st (38)
Fasten off, leaving a long tail for attaching the body to
the head later. Top up on the stuffing.
Head:
1. Using colour B, work 6 sc in magic ring (6)
2. Inc in each st (12)
3. [1 sc, 1 inc] x6 (18)
4. [2 sc, 1 inc] x6 (24)
5. [3 sc, 1 inc] x6 (30)
6. [4 sc, 1 inc] x6 (36)
7. [5 sc, 1 inc] x6 (42)
8. [6 sc, 1 inc] x6 (48)
9. [7 sc, 1 inc] x6 (54)
10. [8 sc, 1 inc] x6 (60)
11. [9 sc, 1 inc] x6 (66)
12-20. Sc in each st (66)
21. [9 sc, 1 inv.dec] x6 (60)
22. [8 sc, 1 inv.dec] x6 (54)
23. [7 sc, 1 inv.dec] x6 (48)
24-27. Sc in each st (48)
28. [6 sc, 1 inv.dec] x6 (42)
29. [5 sc, 1 inv.dec] x6 (36)
30. [4 sc, 1 inv.dec] x6 (30)
Start stuffing the head, keep topping up the stuffing as you go.
31. [3 sc, 1 inv.dec] x6 (24)
32. [2 sc, 1 inv.dec] x6 (18)
33. [1 sc, 1 inv.dec] x6 (12)
34. [Inv.dec] x6 (6). Fasten off and sew across the last sts
to close.
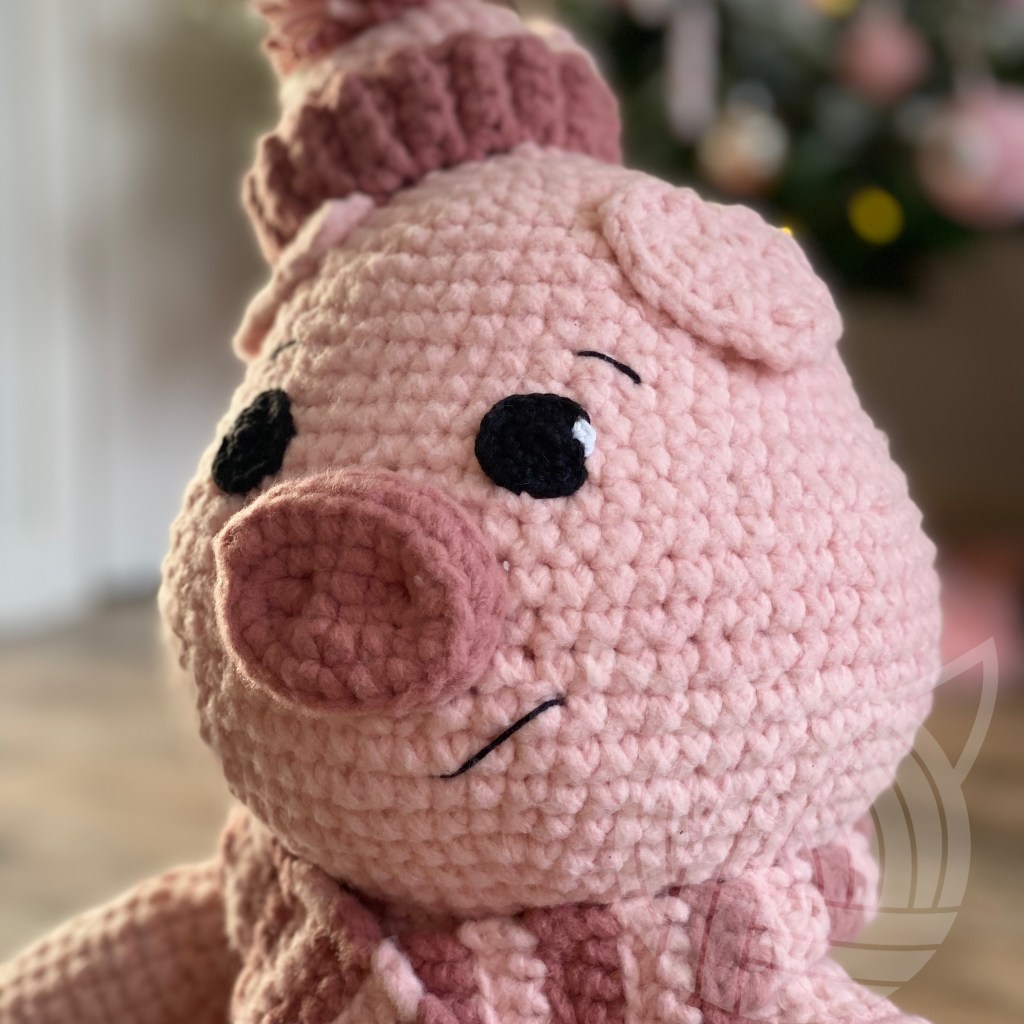
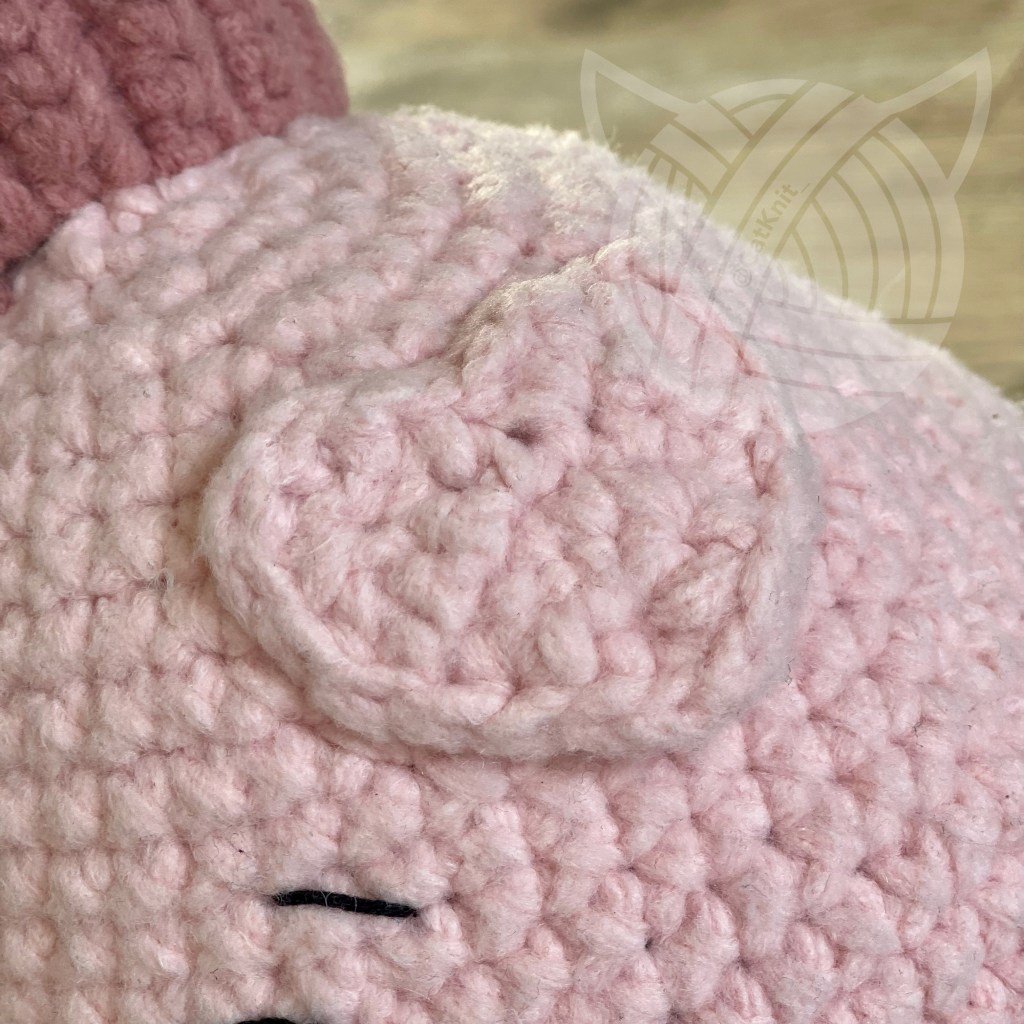
Ears (make 2):
Finished detail shot further down the page!
1. Using colour B, ch 2, turn
The ch 1 at the end of each of the following rows does not count
as a st.
2. [Inc] x1 in the second st from the hook, ch 1, turn (2)
3. [Inc] x2, ch 1, turn (4)
4. [Inc] x2, sc 2, [Inc] x1, ch 1, turn (6)
5. Sc 3, ch 1, turn
6. Sc 1, [dec] x1, ch 1, turn
7. [Dec] x1, fasten off.
Now you’ll work the other side of row 5-7.
5. On the other side of the top half, fasten your yarn in the outer
st of row 4. Sc crochet in the first 3 sts, ch 1, turn
6. Sc 1, [dec] x1, ch 1, turn
7. [Dec] x1, ch 1, do NOT fasten.
With the yarn still on the hook, sc around the heart but avoid the dip between the two top halves of the heart and sc twice in the very tip of the heart. At the end of the round, sl st in the first stitch and fasten off leaving a long tail for attaching the ears to the head.
Snout:
Finished detail shot further down the page!
1. Using colour A, ch 7, turn
2. Sc 6 starting in the second st from the hook, sc a further 6
down the other side of the chain (12)
3. [Inc] x1, sc 4, [inc] x2, sc 4, [inc] x1 (16)
4. [Inc] x1, sc 6, [inc] x2, sc 6, [inc] x1 (20)
5. Sc in BLO in each st (20), fasten off leaving a long tail.
Eyes (make 2):
Finished detail shot further down the page!
Using colour C, work 6 sc in magic ring (6)
Inc in each st (12)
You’ll add the white part of the eye in the next row.
Sc 1 in colour C, [inc] x1 in colour D, change back to
colour C and [1 sc, 1 inc] x5, sl st in the first st. Fasten off, leaving a long tail.
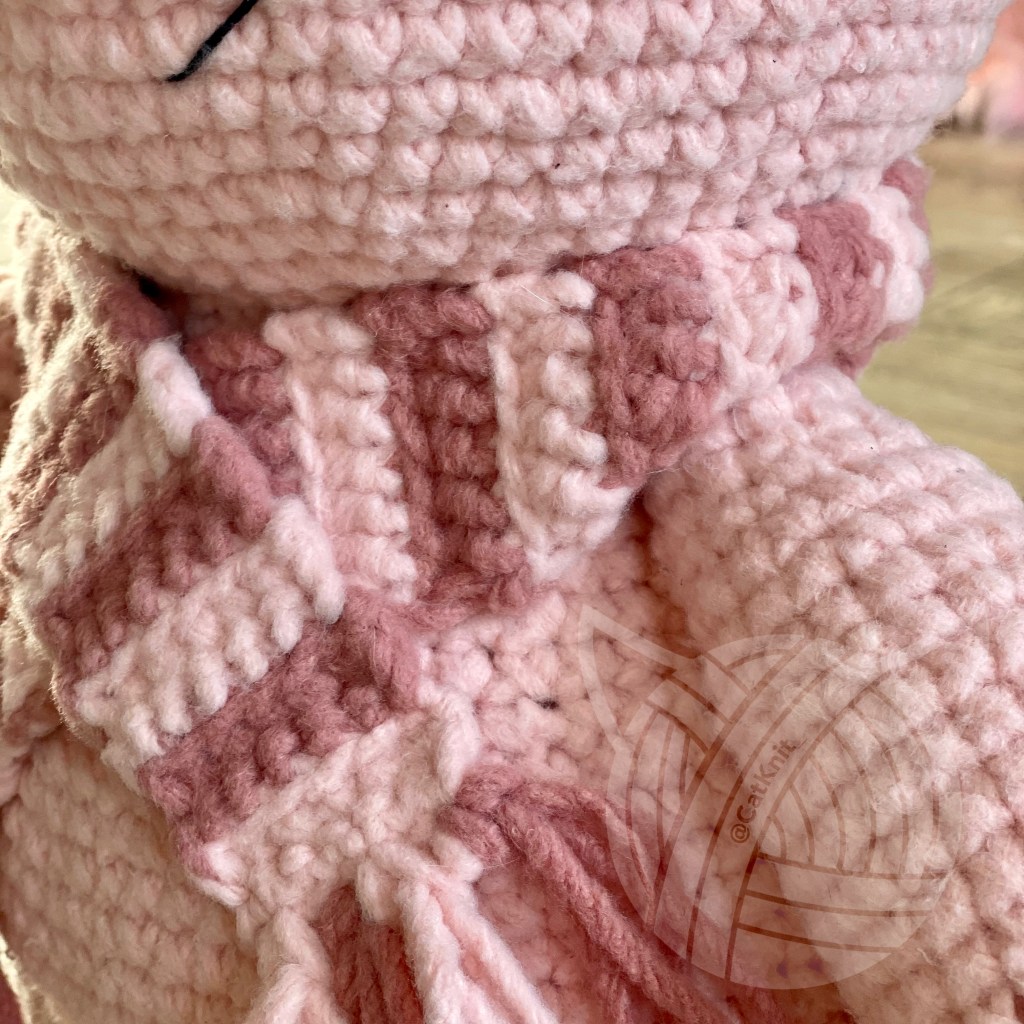
Scarf:
Finished detail shot further down the page!
1. Using colour A, ch 7
2. Starting in the second st from the hook, sc 6, ch 1 (does not count as st), turn (6)
3-4. Sc in each st (6)
5. Change to colour B, sc in BLO in each st, ch 1, turn (6)
6. Sc in each st (6)
7. Change to colour A, sc in BLO in each st, ch1, turn (6)
8. Sc in each st (6)
9. Change to colour B, sc in BLO in each st, ch 1, turn (6)
10. Sc in each st (6)
[Repeat row 7-10] x16, you’ll have a total of 74 rows.
Fasten the yarn. Cut 8x10cm pieces of yarn of colour A & B.
At each end of the scarf, attach two pieces at a time in the same colour along the edge, alternating the colours as you go. Trim up the edge at the end to get a straight line.
Arms (make 2):
1. Using colour A, work 6 sc in magic ring (6)
2. Inc in each st (12)
3. [1 sc, 1 inc] x6 (18)
4. [2 sc, 1 inc] x6 (24)
5. Sc in BLO (24)
6-11. Change to colour B, sc in each st. (24)
12. [2 sc, 1 inv.dec] x6 (18)
13-15. Sc in each st (18)
16. [1 sc, 1 inv.dec] x6 (12)
17-19. Sc in each st (12)
20. [Inv.dec] x6 (6).
Fasten off and sew across the last sts with a straight seam to close.
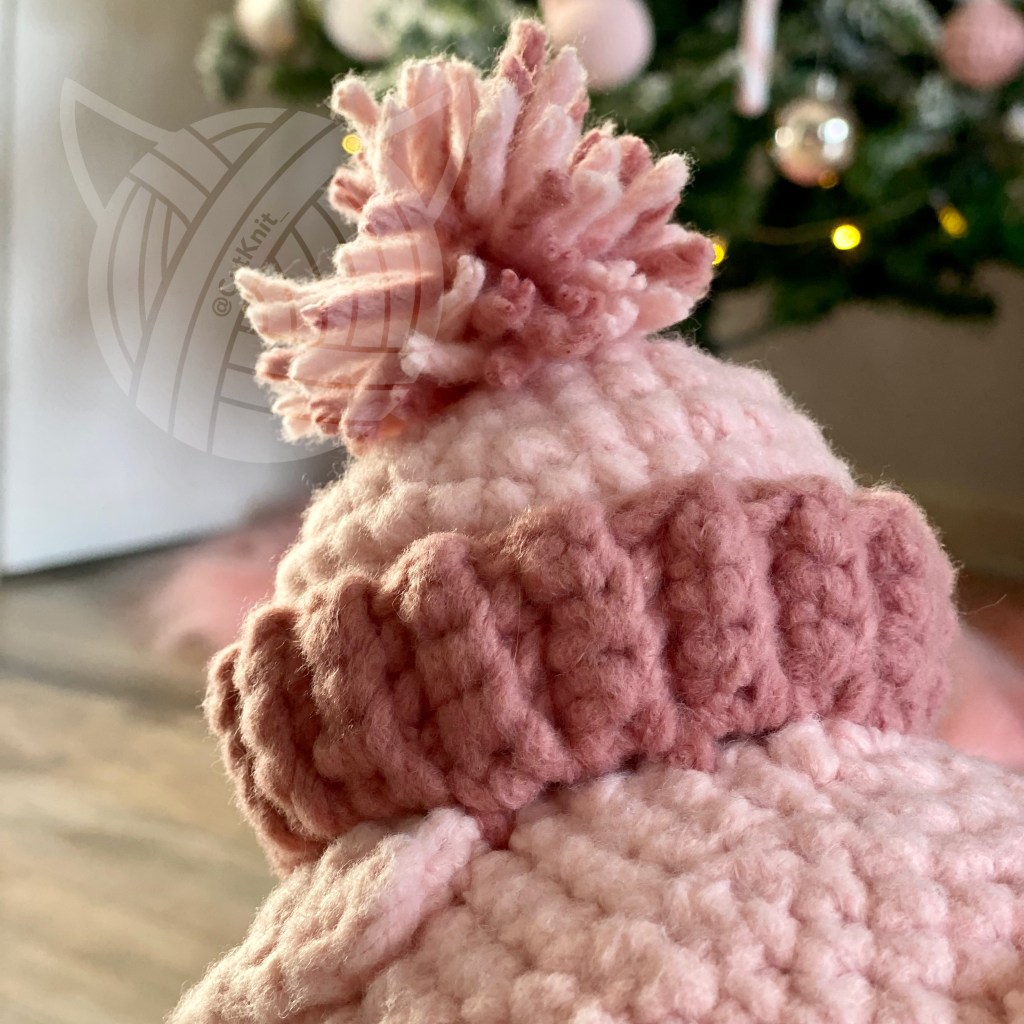
Hat:
Finished detail shot further down the page!
Part 1:
1. Using colour A, ch 5, sc 4 starting in the second ch from hook (6) After each row you’ll ch 1 (does not count as st) and turn.
2-35. Sc in each st. Fasten off, leaving a long tail for attaching later.
Part 2:
1. Using colour B, work 6 sc in magic ring (6)
2. Inc in each st (12)
3. [1 sc, 1 inc] x6 (18)
4. [2 sc, 1 inc] x6 (24)
5. [3 sc, 1 inc] x6 (30)
6-9. Sc in each st, fasten off. Now join the two ends of part 1 to make a circle and attach the the ribbed edge to the outside of part 2, they should sit flush at the bottom of the hat.
Make a small pom pom with colour A and B to sit at the top of the hat with a fork, there’s lots of videos on Youtube!
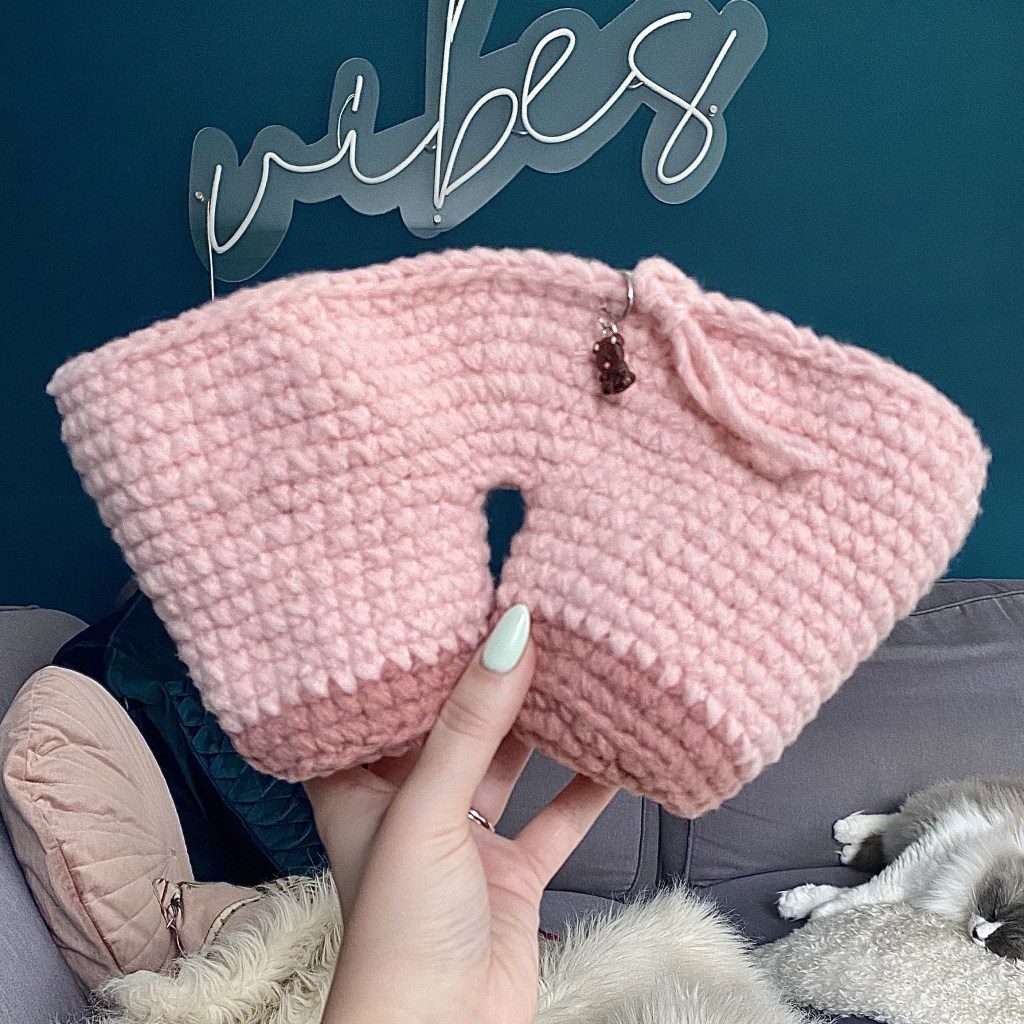
Tail:
1. Using colour B, ch 9
2. Starting in the second ch from hook [inc 1, sc 1] x4 (12).
Fasten off leaving a long tail for later.
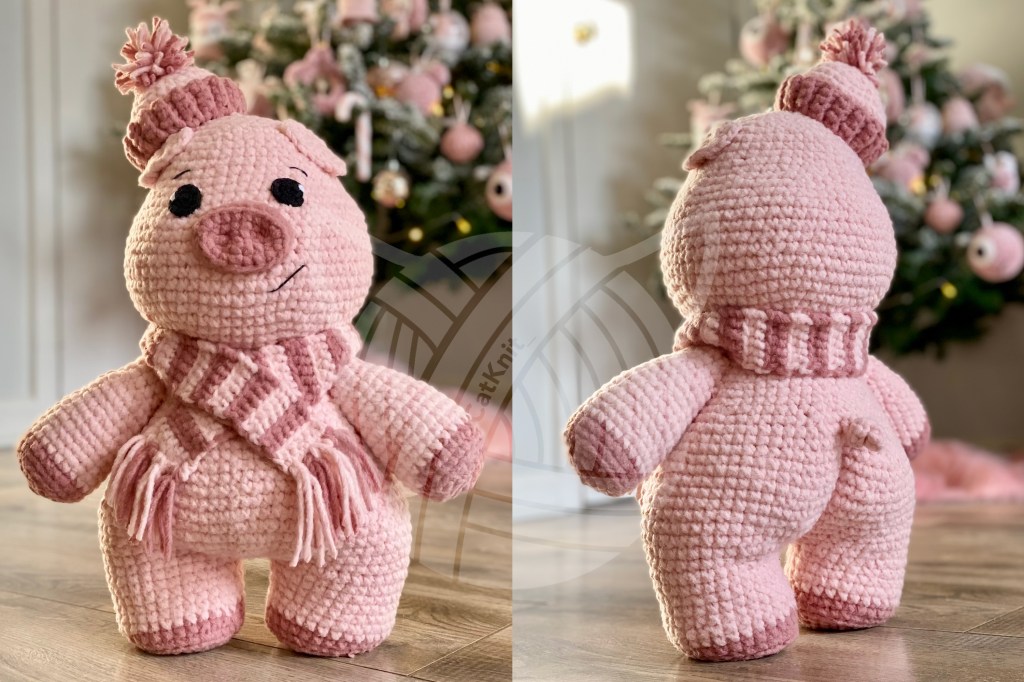
Assembly:
(Before sewing the pieces in place I would recommend pinning all the pieces in place to ensure everything is in alignment for the best result.)
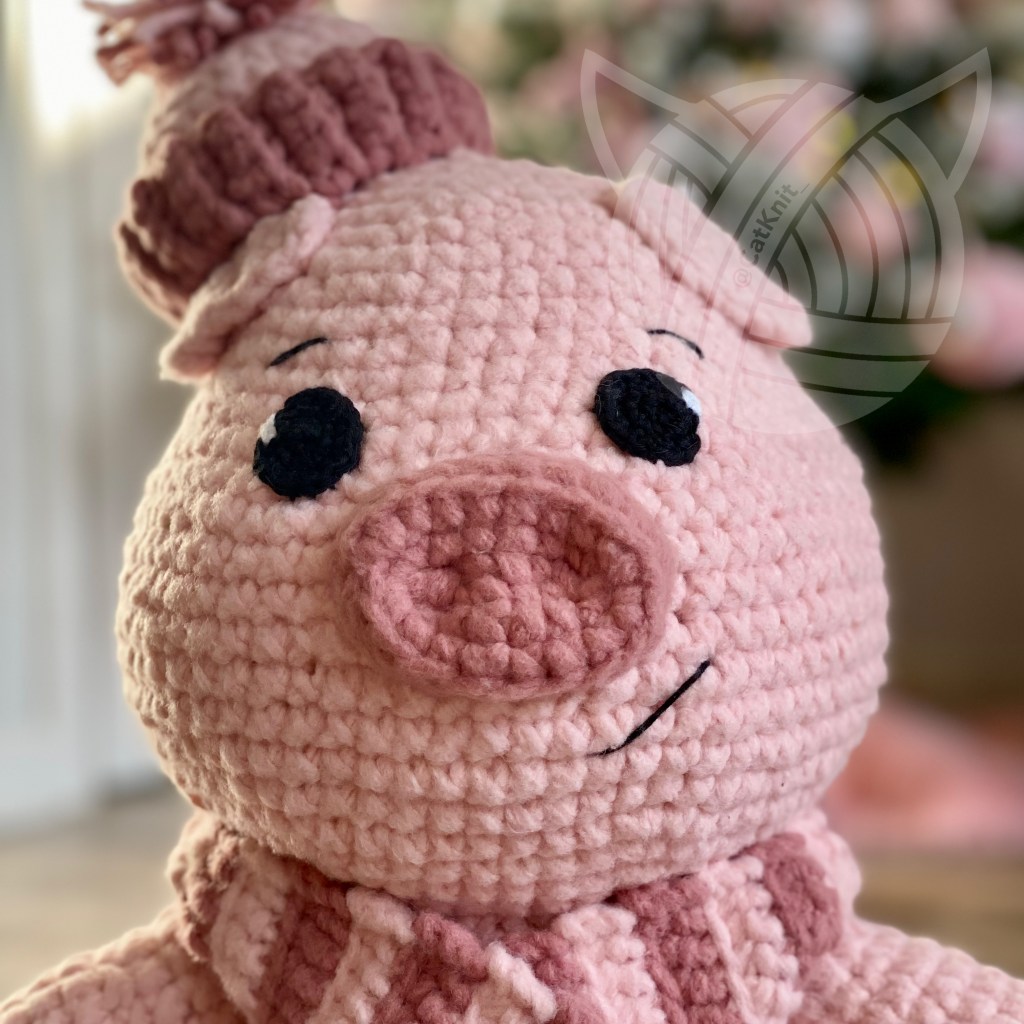
Start by attaching the head to the body in row 7 of the head.
Attach the arms in the second to last row of the body too keep a bit of room for the scarf, with 14 rows in between the arms on the front of the body.
Attach the nose in the middle of the face across rows 16-19, the very top will go in to row 20..
To make the nostrills, using a tail of colour A sew a few sts in each end of row 1 and through the head so that you pull that part of the nose towards the face to make the nostril dents.
Attach the top of the ears in row 29 with 9 sts in between on row 28, the bottom of the ears should align with row 23. Do NOT attach the tips of the ears as you want these to flick up.
Attach the eyes across row 20-22 with 6 sts in between on row 21, the white part of the eyes should be set at 10 o’clock on the left and 2 o’clock on the right.
Using colour C, add the eyebrowns in row 24, with a 2 sts wide diagonal st, with 8 sts in between the two.
Add the mouth across row 14-15, with a 3 sts wide diagonal st, the top of the st should sit 2 sts away from the nose in row 15.
Attach the pom pom to the centre top of the hat.
Attach the front centre of the hat in row 29 at the very top of the ear, starting from just before the middle dip of the heart. It should sit on an angle to the left, making sure the ear flip is visible. Stuff the hat lightly as you go.
For the scarf you want to fold the scarf just where it goes over the arms to tuck it in and make a cross over the body. Sew in place.

Make sure to tag your makes with #CatknitXmas on Instagram so I can see and share your makes!
Happy making!
Cat x

Thanks ❣️😍
LikeLike
🥰🥰
LikeLike